RILEY RM
MAINTENANCE NOTES
RECOVERING A SALOON ROOF
|
RILEY RM
MAINTENANCE NOTES | ||||
|
RECOVERING A SALOON ROOF | ||||
|
| ||||
|
RM MAINTENANCE NOTES
Recovering an RM Riley Roof | ||
|
Fitting a new roof covering and the drip moulding (guttering) to an RM Riley looks like a difficult task and examples can be seen of poorly fitted coverings with creases around the edges and seams that are not straight and central. There are also some roofs which balloon up as the car is being driven. In fact it is not a difficult task and if done carefully and methodically it is well within the scope of the average owner. With luck the whole task can be completed in a day but very often some remedial work is needed to the underlying structure before the new covering can be fitted so additional time should be allowed for this.
Recovering kits are available from the Riley Clubs and from specialist dealers. Beware of cheap kits - they may be made of the wrong material. The original covering was Everflex Topping and its key feature was that it was almost impossible to make it stretch. Some kits have been sold (often with welded instead of stitched seams) which are made of stretchy vinyl as used for furniture covering. Although these kits are very simple to fit as the creases which try to form around the edges are can be pulled out easily, they always end up looking awful. The roof covering is only attached to the body around the edges and the back window. As the car drives along air pressure builds up inside the car and tries to lift the roof covering. If there is any stretch in the fabric of the covering it will balloon up as the car goes along and when the car stops large folds in the covering will be seen. This problem is very apparent on a hot day. If the roof covering you are offered can be stretch by pulling it with your hands then don't buy it. Get one that feels as if it has no "give" in it at all.
Before you remove the old roof covering have a good look at it and see the lessons which can be learned from it. First of all look to see if the seams are straight and central then ask yourself how you are judging them. The book says that the seams should be 20 in. from the centre line of the car. In practice you do not judge how central they are by finding the centre line of the car. Since you can only see both seams at the same time from the back or the front of the car, you judge them by checking that the rear windows lies centrally between them and whether they are equidistant from the edges of the front windscreen. It makes little difference whether the seams are exactly 40 in. apart or not. Of course the rear window may not be exactly in the centre of the car so if you fit the seams centrally they will look wrong compared to the rear window.
It will make life easier later if you stick some masking tape to the body and mark on it the edges of the rear window in such a way that you can see the marks while you are fitting the new covering. If the existing seams are in the right place you can also mark their positions on the tape. The new seams may not be quite the same distance apart as the old seams but they should be central around the marks for the old seams.
Now look closely at the old seams. Is the stitching starting to rot and are the seams starting to split open? The roof covering is made from three pieces sewn together at these seams with the edges folded under inside the covering. Of course you cannot see the edges underneath, so, for the new covering, why not add another couple of lines of extra stitching underneath where they cannot be seen? If you do this and later the visible seams fail the hidden seams will hold the covering together and stop the seams gaping apart. This will keep the rain out until you get around to doing the job properly.
Now look at the edges of the roof and the drip moulding. What happens to the water which runs off the roof? Does it run straight into the drip moulding or does it run between the moulding and the covering? If it does the latter then is runs right over the nails holding the roof covering on. It can easily get past the nails and hence into the wood beneath. Similarly if it get behind the drip moulding it may get under the covering and hence into the wood. For the new covering and drip moulding you will need to stop this happening.
Now for the frightening check. Go around the old roof pressing hard on the covering. Pay particular attention to the areas near the rear window and behind the trafficators. Can you feel things moving or hear creaks? If you can the wood is probably in a sad state and the perforated steel covering the roof structure may be badly rusted. In extreme | ||
| |||||
|
The underlying woodwork. This will probably need repair or partial replacement. | |||||
|
cases the wood may need to be replaced so the task may be much greater than initially envisaged.
Now open and check the new roof covering. It probably came folded up and has some creases in it. If so, lay it out so that the creases get a chance to ease out. If you plan things well in advance it may be possible to lay the new covering over the roof and leave it there for a few days.
Having made the decision to start, first remove the old drip moulding by prising it off with a screw driver. It is best to get help for this as the old moulding will still have the nails in it and it will whip around behind you while you are looking at the bit directly in front of you. As it whips around it will probably take chunks out of you paintwork so get someone to hold the bit you cannot see. Late RMEs have a different type of drip moulding to other cars which has rubber inset in the middle. This does not seem to be available at present so will have to be removed carefully and reused. The nail heads hide behind the rubber inserts. You cannot reuse the older aluminium moulding so throw it away before someone hurts themselves on it.
Now remove the rear window. This definitely needs help from a second person. The window pushes out from the inside but is almost sure to have been well glued in place to prevent water leaks. On RMEs and RMFs (curved rear glass) the inner lip of the window rubber fits over steel plates which hide beneath the inner roof lining. It is very likely that the window rubber will have to be replaced so it is worth getting a new one in stock before you start. When refitting the rubber seal on RME/Fs it is usually easier to fit the rubber to the chrome trim before fitting in the glass.
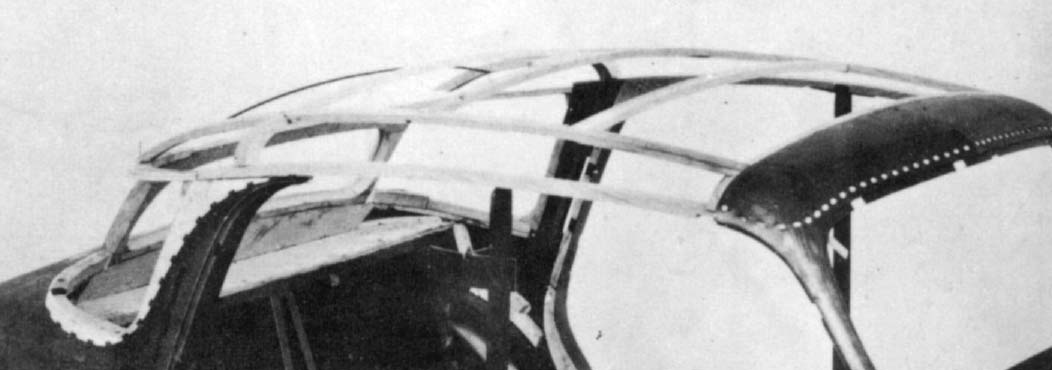
Now strip off the old outer roof cover and any Hessian and wading beneath it to expose the perforated steel mesh. Remove all the nails around the edge which held it on and give the wood a detailed examination.
With luck the wood will be in good condition apart from the nail holes. If there are a lot of holes or splits in the wood these should be filled. Whatever is used for the filling it must be capable of accepting nails without cracking. Wood glue with saw dust stirred into it works well. If the wood is starting to crumble due to water ingress it will need to be strengthened before filling. Wood hardener liberally applied works well even if it is a bit messy. Of course if the wood has completely crumbled away it will need to be replaced. Fortunately replacement sections are available from the Riley Clubs and specialist dealers. If any of the wood has to be replaced it is almost certain that the inner roof lining will have to be replaced too.
It is possible that the steel mesh will also be frayed around the edges. The easiest way to repair it is to rivet in a piece of aluminium. Blind rivets (pop rivets) will hold it to the mesh and it is easily nailed through to attach it to the wood. Clean up the mesh and make sure that there are no nail or screw heads sticking up. Check where the mesh attaches at the front and around the rear window in particular. A coat of rust killer is a good idea but be sure not to drop it onto the inner roof lining. | |||||
|
When all this has been done the wood and the mesh should be firm with no movement when pushed anywhere by hand. Also every thing should be smooth with no sharp edges or projections. It is now time to start fitting the new roof cover.
Originally the mesh was covered with wading held in place with small dabs of rubber glue which was then covered with a layer of Hessian. An alternative which has been found to work well is to use an old felt blanket. Again it can be held in place with small dabs of glue (wood glue works well). Do not use too much glue or it will form hard lumps which will show when the covering is pulled taut. Using the blanket method it is easy to fit it around the rear quarter curves by cutting sections out. If too much is cut out a filling-in piece can be glued in afterwards. This "cut and paste" methods works well and cannot be seen after the outer covering has been fitted. Finally cut the blanket or wading just above the line of nail holes which held the old outer cover. The idea behind this is to ensure that the blanket/wading will be completely covered by the new outer covering to prevent any water being soaked into it later. If wading is used which is fluffy it will be necessary to cover it with a layer of Hessian tacked around the edges to keep it in place. This is not necessary if the blanket method is used. When finished the blanket/wading should be smooth with no lumps, bumps or dips.
It is now time to consider how to stop future water ingress. The outer covering is to be nailed down around the edges so why not add a "gasket" between it and the wood? Simply smear some silicon rubber gasket material over the wood. Use a good quality silicon rubber from your local builders merchant for this instead of buying the expensive small tubes from your local go faster goodie shop. The better quality silicon rubbers do not smell of vinegar. Do not forget to smear some silicon around the rear window as water always collects here. Having smeared silicon everywhere sensible, smooth it off with a wet finger, spatula or rag and remove any excess. Let the silicon harden off and make a final check of everything done so far.
When the silicon is hard the outer cover can be fitted. When this is done it will be necessary to pull it taut and it will need to slide over the blanket/wading. The harder you pull on the cover the harder it grips the blanket/wading underneath it and refuses to slide. To make things much easier place some plastic rubbish bags flat on top of the blanket/wading. Make sure that they are flat with no wrinkles and place some over the rear quarter curves. You will probably need to cut the bags down in size and let them overlap a bit. A perfect jigsaw job is not needed as they are only there to allow the cover to slide easily. They do not need to be fixed down.
Now lay the new cover over the roof and get it into position. The tape marks which you put on the body previously to indicate where the seems should go will help with this. Now pull the covering down and tack it loosely in place with a few nails half knocked in. Final fitting is best done by two people with strong fingers. Unfortunately many of the kits supplied have very little spare material for gripping and pulling which makes life a bit difficult. Ideally there should be at least 2 inches of spare material all round but it seems that those who make the kits have never tried | ||||||
|
to fit them.
With the covering roughly in place, check the position of the seams. Are they symmetrical about the rear window and equidistant from the side of the front screen? If not, remove the offending nails and try again. At this stage the covering will not be stretched taut but should be flat with no major creases. Usually the hardest place to get crease free is around the rear quarter curves. Remove the temporary nails from one side and pull the fabric down and forward and then retack it. Do the same on the opposite side. Remove the nails at the back of the car and pull the fabric backwards and down and retack. Remove the nails at the front and pull the fabric forward hard particularly at the seams. This should pull the seams straight so after retacking make sure they are in the right | ||||||
|
| ||||||
|
Another broken finger nail! | ||||||
|
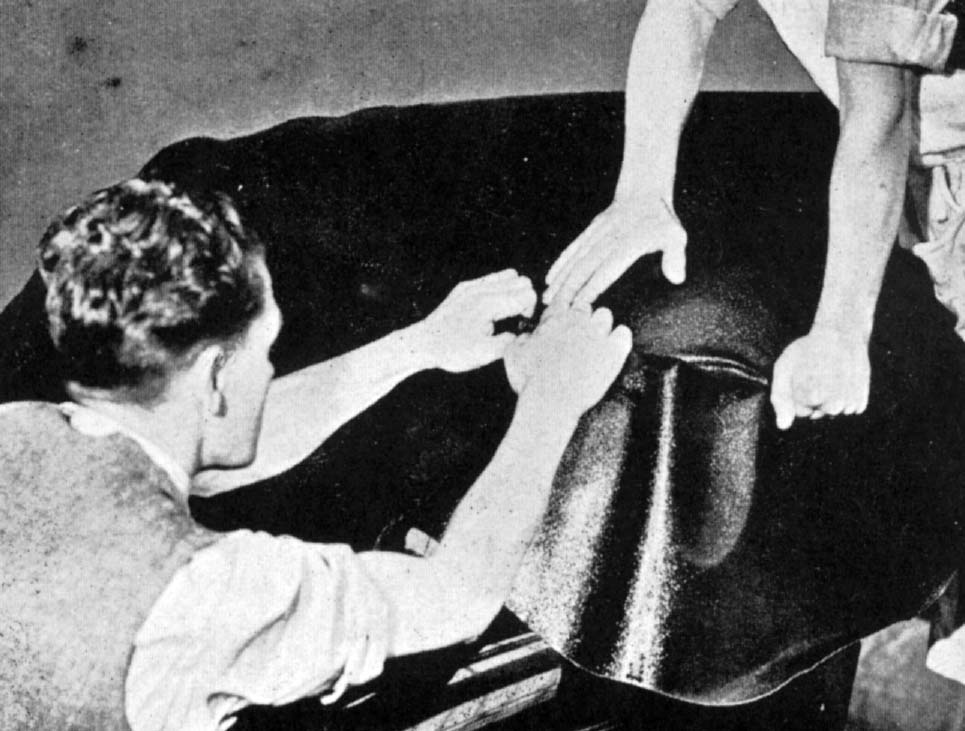
place. Now move to the sides, remove the temporary nails, pull down hard on the fabric and retack. While you are pulling and tacking the fabric do not drive the nails completely home. It is very likely that you will have to repeat the pulling and tacking process several times so you will need to be able to remove to nails. After you have pulled the fabric down hard you will probably need someone to hold it in place while you knock in a few nails. The harder you pull the fabric, the more temporary nails you will need to prevent the fabric from tearing around the nails.
At this stage the covering should be in its final position but may have a few minor creases around the edges, probably around the rear quarter curves and above the trafficators. To remove these creases it may help to cut off any excessive spare fabric below the nail line but do not cut above the nail line and do not succumb to temptation and cut into the creases above the nail line. Remove the nails for at least 2 inches each side of a small crease (more for a big crease) and pull the fabric down very hard and away from the crease just enough to flatten it.
As you work keep checking the seams. It is all too easy the concentrate on a particularly stubborn crease only to find that when you have removed it the seam has been pulled sideways and is no longer straight. By this time the fabric should be very taut all over with no trace at all of movement of the fabric as you run your hand over it no matter how hard you press. If there is any movement, the fabric is not taut enough and needs to be pulled harder.
The whole fitting process is much easier on a hot summer day as this will soften the fabric and make it much easier to work. If you cannot arrange for a hot summer day, a garage which is as warm as possible will have to do. Hair driers played over stubborn crease areas may help too.
When you are sure that the seams are in the right place and all the creases have been removed you can turn to the rear window aperture. Make a horizontal cut in the fabric in the centre of the window aperture over about 3/4 of the window width. Now cut from the ends of this cut into the four corners of the windows stopping well short of the edge of the window. This will give you 4 flaps of fabric, one top, one bottom and one each side. Pull the flaps through the window aperture into the car and mould them around the window frame. It is essential to ensure that water does not get in later so apply more silicon rubber to the window frame where the fabric is to be nailed. Now work the fabric into the window frame and tack it in place. It will probably form small creases at the corners of the window so make several small cuts into the corners making sure not to cut beyond the nail line. Press hard on the fabric and mould it into the corners, tacking it as you go.
When you are satisfied that the seams are straight and all the creases have been removed, the fabric can be finally nailed into place. Do not knock the nails in too hard or they will bite through the fabric. The nails should be about 1/2 inch apart. Finally the excess fabric can be cut off. Do not try to cut too near the nails or the fabric may start to tear at the nails. Leave at least 1/16 inch of fabric. If there are any very small creases around the nails these may well flatten out on their own over the next day or so.
The rear window can now be refitted using plenty of silicon rubber to ensure that everything remains watertight. | ||||||||
| ||||||||
| ||||||||
|
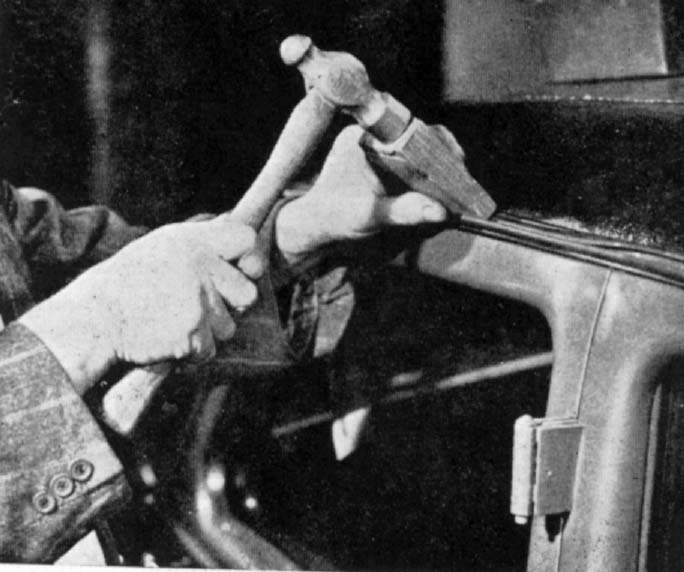
Close the drip moulding over the nail heads using a block of wood. | ||||||||
|
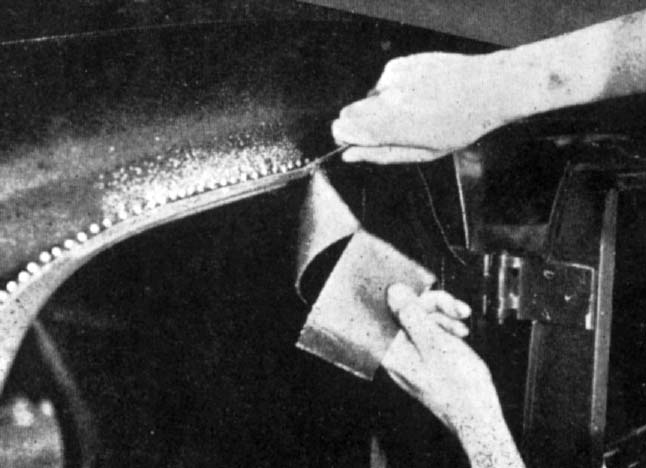
Cut off the excess material just below the nail line. | ||||||||
|
It is now time to fit the new drip moulding. This comes in 3 sections. Two of these are the same and are roughly of U section. One arm of the U catches the rain water while the other has to be closed down over the nail heads. The third section is roughly a L section and the arm has to be closed down over the nail heads.
Fitting the moulding is a two person job with one person having the boring job of making sure that the moulding does not whip around and take chunks out of the paintwork. Using one of the U section pieces (make sure you have it the right way up) start in the centre of the car above the front windscreen. Line up the moulding so that it covers the nail heads and nail it on. The moulding usually comes with a few pre-drilled holes in it but these are usually too far apart. As you nail it in position drill extra holes about 1 inch apart making sure that you miss the nails which are already holding the roof fabric. As you knock the nails in, close the top arm of the moulding down over them using a block of wood to prevent marking the soft aluminium.
Bending the moulding around the corners by the windscreen side pillars needs strong fingers and thumbs. As you bend it around the corners the lower arm of the moulding will try to close up. Hold it where it should be by making up some small wooden wedges. If it does close up you can lever back into place later but this is likely to leave marks on the moulding. Nail it all the way along, closing the moulding as you go until you reach the trafficator area. The side moulding finishes at the lowest point of the hood just behind the trafficator. Cut the excess moulding off at this point and complete the nailing.
Repeat this process for the other side of the car. Where the moulding bends around the windscreen pillars it also dips down a bit and rain water tends to collect here. Drill holes (1/8 inch) at the lowest point to let it escape.
The third piece of moulding fits around the back of the roof under the rear window and is easier to fit as it does not have the lower arm. As you nail it on close it down as before and make sure it covers the heads of the nails holding the fabric.
The final jobs are to paint the moulding and to make sure that it is watertight. Using masking tape, mask off the roof fabric just above the moulding leaving an even gap of about 1/16 inch. Now fill the gap between the moulding and the fabric with silicon rubber, remove the excess and smooth it off. As you drive along, water gets blown up underneath the moulding particularly above the windscreen so repeat this sealing process below the moulding too. After the masking tape has been removed you should have a neat and waterproof drip moulding.
That's the job finished. You should now have a perfectly fitting roof with straight seams and no creases which
feels bow taut when you run your hand over it. It should also be completely waterproof and should give you many
years of trouble free service.
| ||